Using Airtable as a PIM for Shopify
Managing over 12,000 products across 70 categories is no small task. At MyJam, we found ourselves facing an avalanche of data - from sales and pricing details to partner and cost data - and sought a sophisticated yet accessible solution to wrangle it all.
In our quest to always improve data quality, we realised the value of a robust Product Information Management (PIM) system. Beyond just the online store, our operations applications also required precise product information. A PIM would allow us to systematically collect, manage, and enrich our product data, ensuring consistency and accuracy across multiple platforms.
While Shopify is a powerful platform for managing an online store, it falls short when it comes to handling extensive data and supporting our operations team with data unique to our business model like live supplier data and our performance metrics for analysis. Its interface, heavily focused on e-commerce product data, lacks tools for easily slicing and dicing the data or making sweeping bulk changes.
Choosing Airtable

After evaluating several platforms, we settled on Airtable for our PIM. It’s not only easy to use but also offers extensive control over data access and provides robust integration capabilities. We’re on the Enterprise license, and it provides us with good flexibility and control over access levels. Moreover, with Airtable, we have a history of three years’ worth of data at our fingertips - a feature that tremendously aids traceability and data consistency.
The Airtable Interfaces feature is interesting, but we’ve opted just to stick to the simple spreadsheet view.
Ensuring Data Quality
Our approach to data quality involves using a Completeness score—a star rating out of 5. Products don’t get synced to Shopify unless they score 5/5. This score is calculated using a tool we’ve developed, deployed on AWS, that interacts with Airtable’s data. The tool performs the completeness calculation and writes the results back to Airtable. Some of the rules we’ve got in there are things like “sale price must be less than the regular price”, “there must be a title”, etc.
Additionally, we have various formulae inside Airtable itself. For instance:
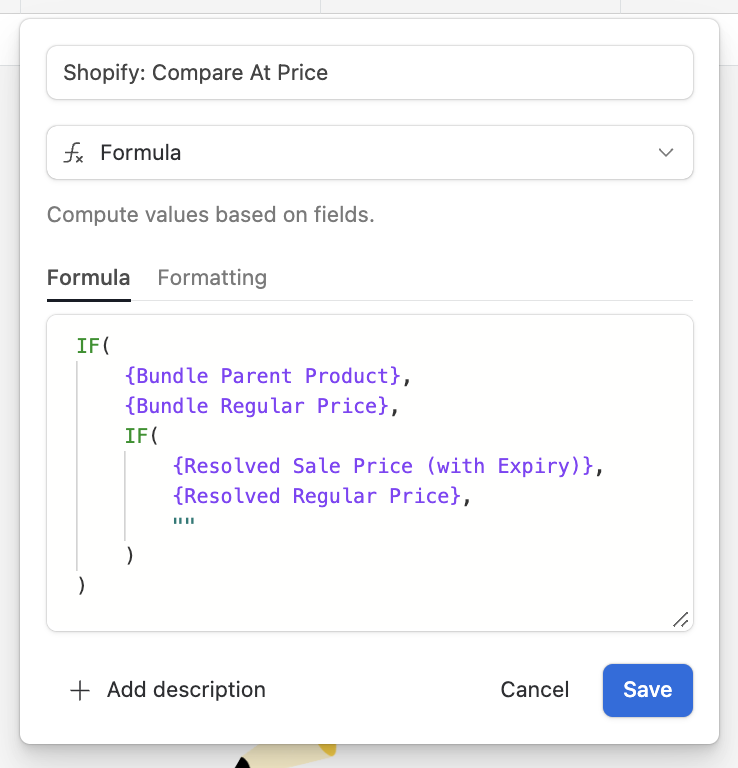
- We pair a
Sale Pricecurrency column with aSale Price Expirydate column to remove products from being on sale at a specific time. - We automatically calculate the price of our product bundles (BBQ Boxes, recipes, etc) by summing the regular prices of the constituent products and automatically applying a discount,.
- Very soon we’ll be able to link up our Partner price information directly up to our pricing to automatically apply our margin to the product and help eliminate any pricing discrepancies.
Encoding this kind of stuff in Shopify would be difficult, although may be possible with Flow?
Integrating Airtable and Shopify
Previously, we relied on a tool called Airpower for integration, but performance issues led us to develop a more robust solution. We integrated Shopify with Airtable via their API, keeping the 5 requests/second API rate limit in mind.
Our backend, written in TypeScript and deployed to AWS Lambda, runs 24/7 to be as responsive as possible, and runs with no concurrency to simplify the management of the rate limit.
Using views to reduce the amount of rows returned from the API call and only updating the data we need to update gives us real-time responsiveness.
Looking ahead, we plan to utilize the Airtable Webhooks API to add tasks to a queue instead of us polling, keeping the no-concurrency, 24/7 Lambda running but fed from a queue. We already use Airtable Webhooks in other applications (our finance ledger and price database) so it should be fairly straight forward to move to.
Why AWS over Airtable Automations?
While we did experiment with Airtable Automations initially, the developer experience was not up to par. A lack of local testing support and frequent timeouts made them unreliable. Therefore, we shifted to AWS, which provided a more reliable and high-performance environment.
Designing Integrations with Airtable
There are a few patterns that we’ve used to implement an effective Airtable integration:
Use Dedicated Forumlas for External Fields
When building an integration with a third party system, the temptation is just to reuse the same columns that you users interact with. For example, you may have a Price column in your base and a Price column in Shopify. Although it’s tempting, don’t use the Price column directly in your export logic, instead create a new column called Export: Price and use a formula to bring in the value you need.
Your column will start off with what feels like a pointless forumla, e.g. ={Price}, but this decoupling of the user data from the export data will pay off. As soon as you start needing to add more complex logic about what a Price actually is, you’ve isolated what you need to change. In our use case, we were very easily able to incorporate bundle price calculation by just rewriting the forumla and didn’t need to modify any system.
Build Views that are Job Queues
If you’re integrating on Airpower you’re probably either exporting the data out of Airtable, or you’re performing some actions on the data already in Airtable. Either way, you’ll need to keep track of rows that need work, and those that you’ve already done.
We’ve used a couple of different techniques for achieving this:
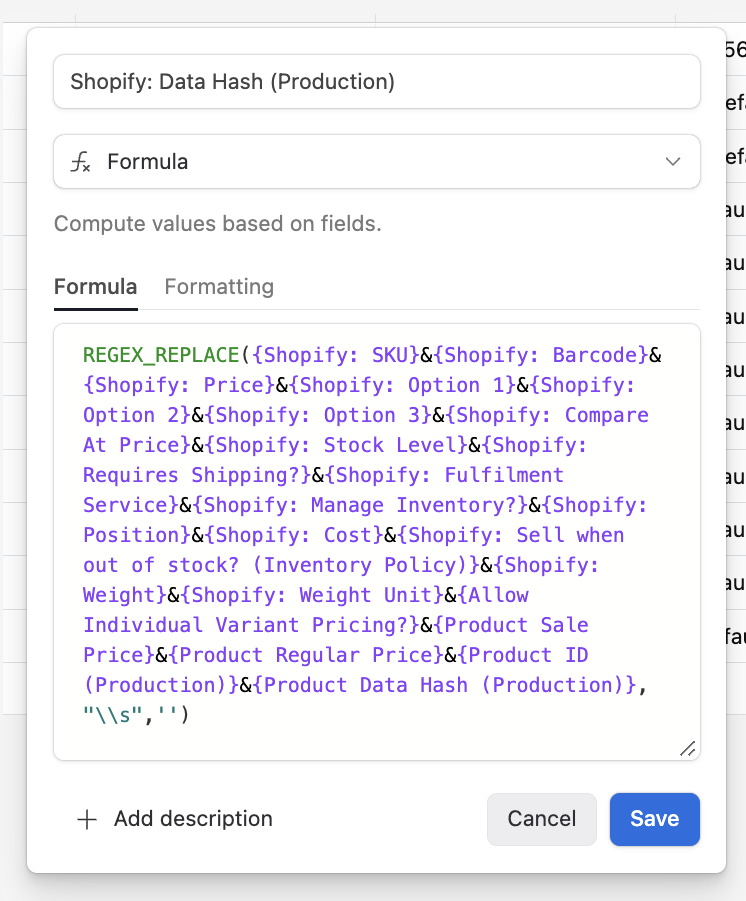
- Data Hashes
- “Last Modified Time” columns.
The Data Hash approach is pretty straightforward. We build a hash of all of the data we want to sync to the external system using a formula and put it in a column called “Data Hash”. We then add a plain text column called “External Data Hash” that the External System can write to.
When the External System successfully processes the row, it writes back the value of the “Data Hash” column it received to the “External Data Hash”. To build up our “job queue view” we then simply a the filter {Data Hash} ≠ {External Data Hash}. As your integration processes the rows, you’ll see the data disappear from the view before your eyes!
The “Last Modified Time” approach is a bit more involved. You should use this when you have an integration that needs to compute a value based on some data in Airtable and then write back the result to the same table. For this you need two columns:
- An Input Column that is a “Last Modified Time” column but only tracks the columns that affect the input of the computation.
- An Output Column that is, again, a “Last Modified Time” column but this time only tracks the columns that are affected by the output of the computation.
When the External System performs its computation on the row data, the simple act of it writing back a value to one of the output columns will cause the last modified time to be updated to the current time. We can use this fact then to build up a filter in Airtable that can be used to limit the contents of a view to only show rows where the Input Last Modified Time is greater than the Output Last Modified Time. This then creates our job queue!
This filter does need to be implemented as a new formula column though as two column values cannot be directly compared in a filter, but the idea is the same.
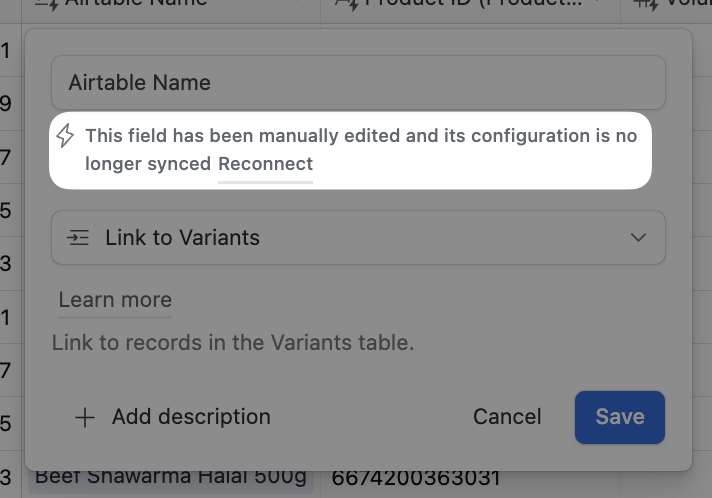
Don’t use a Primary Key as your ID Column
If you’re coming from the world of relational databases, it’s awfully tempting to use an auto incrementing integer, or a uuid as your key in your table. The ID column is not a primary key in the traditional sense. It doesn’t have to be unique and isn’t used for joining data together. The ID column should be a good textual description of the data in the row because it’s what your users will search against when the table is used in lookup fields.
To avoid this thinking, we rename the ID column to be “Airtable Name” and pull in the relevant data. For example, our formulas for the Product and Variant tables are:
1
2
Product: Title & IF({ID (Prod)}," (" & {ID (Prod)} & ")")
Variant: {Product Title} & IF({Option 1}, " / " & {Option 1}) & IF({Option 2}, " / " & {Option 2}) & IF({Option 3}, " / " & {Option 3})
These provide excellent summaries for the row data when linking tables together.
Use Synced Tables for Everything
Airtable really comes into its own when you start plugging more and more data into it. For our PIM, we needed to get some operational insights (cancellations, refunds, sales data) alongside the product data. We’re being really strict about the data in the PIM and separating concerns as best we can, so we decided to use two separate bases to hold the data (this also has the nice side effect of doubling our API limits!). We then used a synced table to bring the data from the data-specific base into the PIM.
You can use a neat technique to link the data in the tables. It’s a bit involved but:
- Create a view in your original base that provides enough information for your new base to work.
- Sync this view into your new base.
- Add the data you want to sync back to your original base to the synced view in your new base.
- Sync the synced table in the new base back to your original base!
Once the data is synced back then modify the Airtable Name column to be a lookup column against your original data, and that’s it! Your data is now linked into your original and you can manipulate and use it right alongside your original data.
Lock your Views
A really basic point which will save you a lot of frustration is to lock views and make specific views for specific purposes. This is particularly important when you’re referencing a view in an external system.
So, that’s it! By incorporating these strategies, we’ve effectively streamlined our product information management using a blend of Shopify, Airtable, and AWS. This has given us a lot of agility with our data and let’s us make informed decisions and effectively make changes to our catalogue really easily.